![people element logooo.png]](https://20709424.hs-sites.com/hs-fs/hubfs/people%20element%20logooo.png?height=50&name=people%20element%20logooo.png)
Create a Single User
In the PEOPLE tab select manage user roles.

Click the orange plus icon to create a new user.

Enter the user’s first name, last name, and email. Email is a required field that will become the username for the platform user. Under roles, check the box(s) for the appropriate access in the dropdown menu. For a description of each role, review this article.
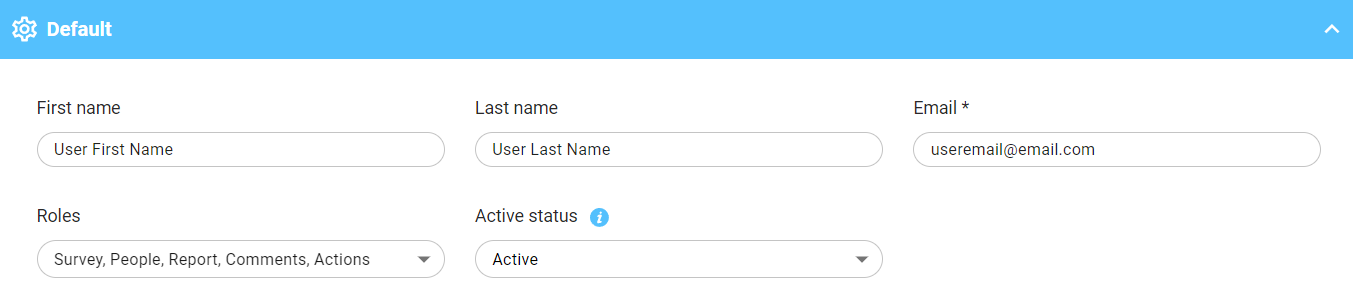
If this user should have access to all data from all surveys, you can stop here and click save. If the user requires any survey or data restrictions, before you save you will need to set those parameters within the survey level access and data level access sections as needed. Review this article for further instructions. Once saved, the user will receive an automated email that will allow them to create their own password (this email will only be sent to new users and if a role is assigned).
Users will create their own passwords which must:
-
Be at least 6 characters
-
Contain at least 1 uppercase letter
-
Contain at least 1 lowercase letter
-
Contain at least 1 number or symbol
Create Users in Bulk
To add multiple users at once, you can use the provided Excel template. Click export on the manage user roles page to download an Excel file to view, edit, and/or add users.

See the following sample template:

Using the Excel Template:
-
System_id (column A): Will be blank when adding a new user. An id will auto populate once a user is imported to the platform. If a system_id is displayed for a user, leave it in the file; do not remove it or the column.
-
Enter the user details for first name, last name, and email (columns B-D).
-
Enter the appropriate roles (column E). Role names need to match exactly to the names listed in the platform. For a description of each role, review this article. Multiple roles can be added and separated by commas.
-
You can add survey level access (SLA) in the employee experience surveys and multi-rater feedback surveys columns. If you do not have a multi-rater survey created, this column will not appear in the template.
-
Enter "All Surveys" in the employee experience surveys column if the user should see data for all surveys. This is the default setting for all new users. To restrict access to specific surveys, enter in the survey names exactly as they appear in the platform. You can add multiple surveys separated by commas.
-
If you have multi-rater surveys (Manager 360) you will see the multi-rater feedback surveys column. Type "No Survey Access" if the user should not have access to these surveys. This is the default for all new users. To grant access to specific surveys, enter in the survey names exactly as they appear in the platform. You can add multiple surveys separated by commas.
-
-
Active status: Type “active” in the Active Status column. If you need to make a current user inactive, type "inactive" in this column.
-
You can add data level access (DLA) using the dropdown menus after the active status column. This is optional. If nothing is in these columns, the user will have access to all data for the surveys assigned in the SLA column/s.
-
Once completed, save the file and upload to the platform using the import button on the manage user roles page.